Postwork is working on the render file in a image editor like Photoshop or GIMP.
Starting with the render file
First, use Colors-Curves to generally brighten the image.
Mucha images usually feature fantastically long hair. Postwork is a great way to do it. There are brushes that are created just for drawing hair. The fall into two main types. One type uses carefully placed and colored dots that will produce a good looking hair strand when you stroke them. One nice set of these brushes are made by el-L-eN who has made them available on Deviant art at Brushes
The other type are actual images of hair strands that you size and place like other image brushes. I like the set called GIMP Wavy Hair Brushes, by Project-GimpBC also on deviant art at Wavy Brushes
Create a new transparent layer. Zoom in on the peep hole by the neck.
Make your new layer the active layer and select the color selection tool. Turn off anti-aliasing and select transparent areas. Turn on Sample merged.
Only a portion of the peep hole will be selected. Its possible to get better coverage by increasing the tolerance, but this picked up a lot of unwanted strays, so I change the color selector to add mode and clicked on the missed areas until I had good coverage of the peep hole area. Change the foreground color to match a dominant hair color and set the background to match the peep hole. Change to the brush tool and choose one of the dot type hair brushes. Make it very small to work into the peep hole area. Draw arcs to look similar to the nearby hair until the peep hole is mostly filled.
Create a new transparent layer and make it active. Using a strand image brush add to the rendered hair. Be sure to change brush types and size often.
Because these hair extensions are on their own layer, it is possible to move the around a little and erase portions. Keep going until the hair matches the spirit of the original pose.
Here is a video tutorial on How to do the IK (called Action Tool in the Tools menu) which turns your cursor into a tool for moving the body parts.
First I loaded the 2EZStudio (made yesterday in Modeling Monday 4) from Scene Subsets
Then I loaded Victoria 5, and V5 Ponytail and chose a standing pose with arms raised from V5 poses. Y rotate to about the best orientation and pined the feet (like the video) and switched to the mid Thigh camera. Move the hip with your Action Tool cursor and then pin it. Next I positioned the head and pinned it. Now click on a hand and move it to about the nearest location like the Mucha original. Then the other hand. For me, this was faster than the previous approach. I could not move the fingers well with action tool though and wound up using the sliders in the parameters tab to pose the fingers. It took a long time. I really need to get some hand poses.
Next I worked on the expression. I prefer to get the pose close to done before working on the expression. So, I can be sure it works with the pose and camera.
There are two basic rules to remember.
1) Always brush your teeth twice a day.
2) Never, never use the zero expression.
:)
I tried quite a few clothing changes until I got some clothes that allow some transparency. I used Adam Thwaites Bodysuit. A Freebie at bodysuit
It fit the pose well, and changed color easily by changing the Diffuse color of the various sections of the body suit.
First I tried dropping the opacity of the sleeves, torso, and legs to 80%. I left the shorts at 100% because I don't want my blog to fall into the adult content world.
As you can see there are a number of spots that look about like holes in the body suit. These don't show in the preview, but are in the render. I tried the Mesh smoothing in the parameters with some success.
but not enough. This is more than I want to try to fix in post works. The curved surfaces will make post work fixes hard than just clone stamping.
I put the sleeves and legs back to 100% and got useable results.
A note about using the preset lighting -- the 2EZ lighting I set up before. This is certainly not the best possible lighting. At this point in my 3D Art Journey I am not looking to get great lighting. I want beginner's lighting -- a clear figure and environment, with some shadows for shaping. I'm sorry. I am just not up for trying out a lot of lighting now. I think that will slow me down from learning posing, colors, surfaces, shaders, and a number of other topics. I will try to improve the lights from time to time, but I now have a platform that let's me work on figures and faces and I can work on lighting later, when I have something I actually want to light well.
These images make clear that a lot of Mucha's charm comes from the extreme, fanciful detail. That level of detail and additional stuff for the image is far beyond my abilities and budget just now, but I think these images have benefited from study of the Mucha images and have a charm of their own.
Certainly 3D Art is capable of a finely detailed expressive face, that would be nearly impossible in a hand drawn lithograph.
in a 2D editor (I use Gimp 2.8) create a new transparent layer over the image.
In the new layer with the brush tool black out everything in the image that is not the figure. Export as jpg. Working on the transparent layer preserves the image so it is simple to check your work and make corrections. Don't spend a lot of time. Good figure isolation can be very time consuming, but we don't need good edges this time, just be sure the pose is evident.
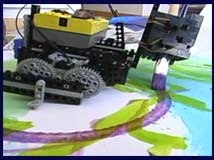
Create a new Plane 2 m and in diffuse color click on the small triangle on the left side and browse to your blacked out pose guide.
For the plane click on the small triangle for Opacity strength and browse to your pose guide again.
Do it all again so that you have two planes with your guide and arrange a zero level corner with the two guides at right angles to each other with one in the back and one on the left. Create a third plane, but leave it blank and don't rotate. Z translate it until it aligns as a floor for the guides.
Add in Genesis
Add skin, hair, and a long dress
Find the closest pose available and apply it.
Make what adjustments possible to fit dress to sitting pose. Try to find a long dress with a sitting adjust (SittingAdj or just Sitting in parameters Moves) This is Genesis MFD. Arrange the view as straight on as possible. Try getting the grid center line straight back into the distance and until the floor almost disappears. << r07 >>
In this example the background guide is too large, but that is expected. First turn G's head until it is straight ahead like the guide. To do this expand Genesis until the Head can be selected.
Use the bend, twist, and side-side parameters that are available for the head.
Generally align the figure with the back guide then Parameters-scale the back guide to the closest size match. Remember this scale amount.
Save your work often. Please do what I say and not what I do. I just lost it all here. I will get as close as I can and resume.
Apply the exact same scaling amount to the other pose guide. For this pose this side is much less useful, but it still can give us some check points. In this example the side guide is good for measuring, but not for aligning.
In the scene tab right click on Genesis and expand all. Choose body parts in scene and adjust with parameters trying to align with the back guide. Check against the side guide often to be sure sizes still look right. I have the best luck when I position the hip into the closest "location" and then move each body part from the hip out until it looks right.
This is near the pose for positions, but nowhere near the pose in feeling. I scaled the chair to fit the pose and opted for fantastic hair.
Alphonse Mucha was a Czech artist renown for his posters that are now seen as some of the best of Art Nouveau. His Wikipedia article is excellent on his bio and history.
Mucha's outstanding posters can be put into 3 main groups: single figure mostly advertising, coordinated sets of singles figures representing seasons, stones, etc. and single heads usually in profile.
He first became famous for this poster
with this one
being a close second. My personal favorite is
For this project we will consider, what are the main elements of a Mucha poster and review them for what we can emulate in 3D Art.
Elements of Mucha Poster image
Woman
Pose is either simple static or extreme curving
Expression usually distant, neutral, uncommitted
Flowers - big blossoms usually in 3/4 view
Vines - unreal, abstracted, a flourish on the framing
Frames inner, outer and partial
Dress - long and flowing, extreme textures or plain
Hair - very long swirling, ...
Ornament - usually fantastic, crescent, disc, ...
Backgrounds painterly and gradated tans, grays
Opportunities for 3D and 2D
In 3D we can learn more about posing and managing hair and flowers.
In 2D we can learn in postwork in an image editor painting extensions of hair and dresses, text
backgrounds, ornaments, and frames.
The first goal in this project will be to test the elements in 3D scenes
Duplicate of Mucha posters) with strong attention to posing.
Post work (in 2D) for frames, backgrounds, swirling hair & dresses.
Nest investigate how to update to be more contemporary approach:
1)closer framing partial figure more than full figure 2) fewer and less extreme swirling elements 3)concentrate on material textures like silk, velvet more than brocades... 4)composition more 3D than 2D :less flattening, less planar
5)2D elements Backgrounds, Ornaments, Frames, Flowers (hand drawn or photos)
After the major goals are blocked in there are many small fixes before reaching the final render. This is often called "tweaking". We will look at tweaking the previous project.
Recently I have before concentrating on the postcard (4x6) as a format. I use this format as often as I can to build up some experience composing in this format.
So first I change to vertical postcard in Render setting. It is possible to save your own formats in render settings with a button called Save Presets... and I have done this for vertical and horizontal postcards.
I want to eliminate the small peek through to the background near her cheek and neck. First I'll try turning the head a little.
Turning toward the small openings didn't work, so I turned the other way which leaves larger and less objectionable openings.
I recall there is a hair parameter to make the pigtails tighter. So try that and make the hair short as well as out of the eyes.
That is the best I can do with the hair for now. Hair takes up a large percentage or the rendering time. To speed up working on the next tweaks I am going to turn hair visibility off for a while.
The eye and head position need work. Although I like the head position in the frame now, I really don't like the arm pit view, so I am going to try some other positions.
try aiming the lights and adjusting intensity.
Try with hair.
An upgrade to DAZ Studio (now 4.6) is now available and includes a new basic subsurfance shader which is designed to produce better skin. Here is a quick first try. To study the difference its best to put the last two images into a photo viewer, such as photo gallery or picasa and the go back and forth between the two images. I like it a lot and look forward to learning more about how to use it.
The information in this project depends on the earlier Project My Fiery, especially for the 2EZ light set made in that project.
Start with the second ready to render scene from the tutorial.
Change backdrop to none add a plane 4 m X rotate 90 Z translate -100
Remove the lights but keep Genesis, tankini, shorts, hair, and camera 1.
Add in out 2EZ light set.
Next we zero Sally Mae Hair. This means going to the parameters and setting every single one to 0.0 This will go faster after clicking on currently used which will reduce the list down to the one's in use now. The items whose names are grayed out affect the hair indirectly do NOT change them.
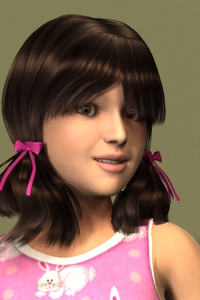
I was never happy with this project. The childish hair and man's underwear look, just didn't work for me. Let's take advantage of a very power ability of the genesis figure and make this a cute little girl instead. This is way easier than it sounds.
1) select genesis in the scene tab. In parameter click All to change back from Currently Used. under Actor - Universal - Basic Child move the slider to about the middle. I used 0.47 The figure becomes much shorter aim the camera to reposition for this size.
2) Still wearing lipstick. In Content Library go to People - Genesis - Materials and double click Basic Child - No Gen. This should change the skin and the makeup. Genesis should be selected in the scene tab before choosing Basic Child - No Gen.
Select tankini in the scene tab. In Content Library - People - Genesis - Clothing - K4 Basic Clothing - Materials. On the bottom row is a pink tankini. double click.
Select SallyMae Hair in the scene tab then in Content Library
People - Genesis - Hair - SallyMae - Materials
There is a Ribbon Neon Pink Hair color changes are here also, but I stayed with the current color.
Eyes
Last Friday (Freebie Friday 2) I showed were to find some free eyes for Genesis.
Select Genesis in the scene tab then in Content Library Presets - Materials - Gee - Eyes I liked brown 4.
Now is time to work on an expression. Please remember to save your scene often as changes are made. In the scene tab expand Genesis and select Head. In Parameters drill down to Pose Controls - Head - Expressions Here you will see a large number of expressions to choose from you can even combine several together. I used Excitement 0.77 and Happy 0.08


3_5.jpg)

3_3.jpg)
3_4.jpg)
3_5.jpg)
3_6.jpg)


3_5.jpg)