Showing posts with label Modeling Monday. Show all posts

Monday, September 23, 2013

Modeling Monday 8


Horse Statue


Simple Horse Statue


We start with the free Millineum Horse from DAZ   Millineum Horse


I see it says $6.95, but at the top of the initial page it says free for platinum club members or with any purchase.

If you are on a tight budget, like me, the Platinum Club is an essential.  Since I don't know much about what I am doing, the really big models often overwhelm.  The PC has thousands of models, hair, poses, ... for $2 or $3.  I think it is essential.  Most of the models, and modifiers, I have come from these items.  You could say that I now have piles of the wrong stuff, and that is true, but I am learning for $2 each instead of $40 each.  Many of the expensive items are a major boost to good work, but many also don't fit my goals.  You may benefit from the same approach.

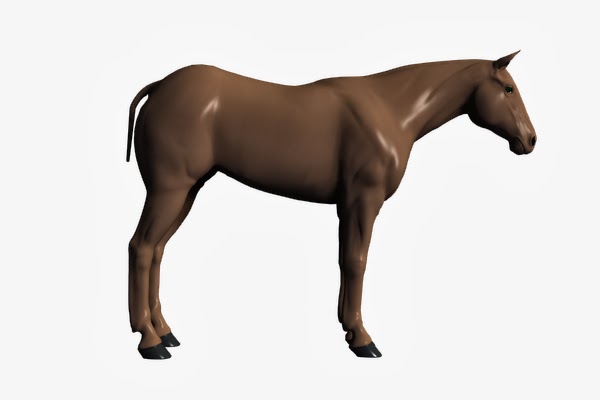
Load the horse.  It will be under poser format->( your library name )->figures->DAZ Animals


default horse

This model has an amazing number of parameters.


Be sure to click All to see them.  They are not grouped under a heading, so if you click general, etc.  You won't see them.

First you can choose from a number of breeds.( To use the breeds set one of them to 1.0 and the rest to 0.0 unless you want to create your own blend.)


Thoroughbred


Arabian


Donkey


Shetland


Let's go with


 Mustang

There are some problems with the tail and mane.  There are a lot of tail parameters, but the didn't seem to work.  To get the tail first we have to go to surfaces and up its opacity.


Wow, that's a lot of tail.


There is a tail length parameter.  -0.50  looked right.


The mane is a little more complex.  There are three manes  ManeLeft, ManeRight, and ManeUp.  Setting opacity to 100% percent didn't do anything for ManeRight, or ManeUp.  ManeLeft was huge and confusing.  There are "Gone" parameters for the Manes.  I went with ManeLGone at 0.0 and the others at 1.0 which gave me a mane on the left.  Not great, but visible.  Let's fine tune the tail and mane after we get a pose.

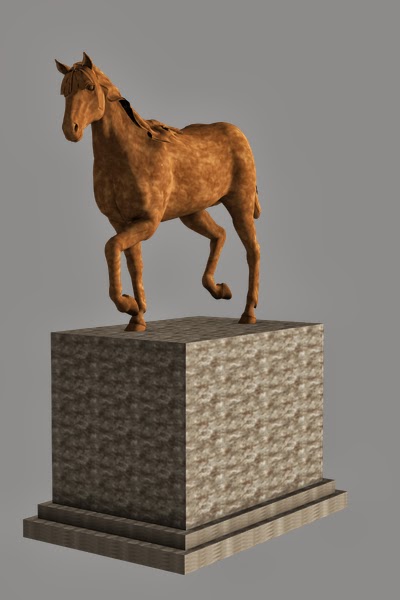
look in poses->DAZ's Mil Horse


I like Walk for a statue.

After tweaking the mane and tail, here is where I wound up.


Some tips.  Unless you want a draft horse you want the fetlocks gone and invisible.  I couldn't find a setting I liked for the forelocks, so I made them gone and invisible as well.

Now for a base.  Create a cube  I made it 3 m with 10 divisions.


Working from the left and top views scale and translate until you have a good base


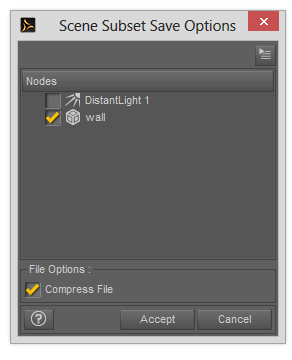
Rename the cube to base and group with the horse into a group called ceramicHorseStatue.  Scale that group 10%  and save as a scene subset.  This is now a table top size (20 cm  about 8" tall) statue.

Control-Z to remove the scale change.

Create another cube like before.  Click on the first cube we renamed base then press Control-C to copy settings.  Click on the new cube2 and press Control-V to transfer settings.  Using the top view align this new base exactly like the first one.  Then scale 110% switch view and Y translate it down until it is almost completely below the base, but still has a small overlap.  Rename it to step1

Repeat this and make a step2. Y scale the base until it is now 70% instead of about 6%. Y translate the horse until it is on top of this new structure.


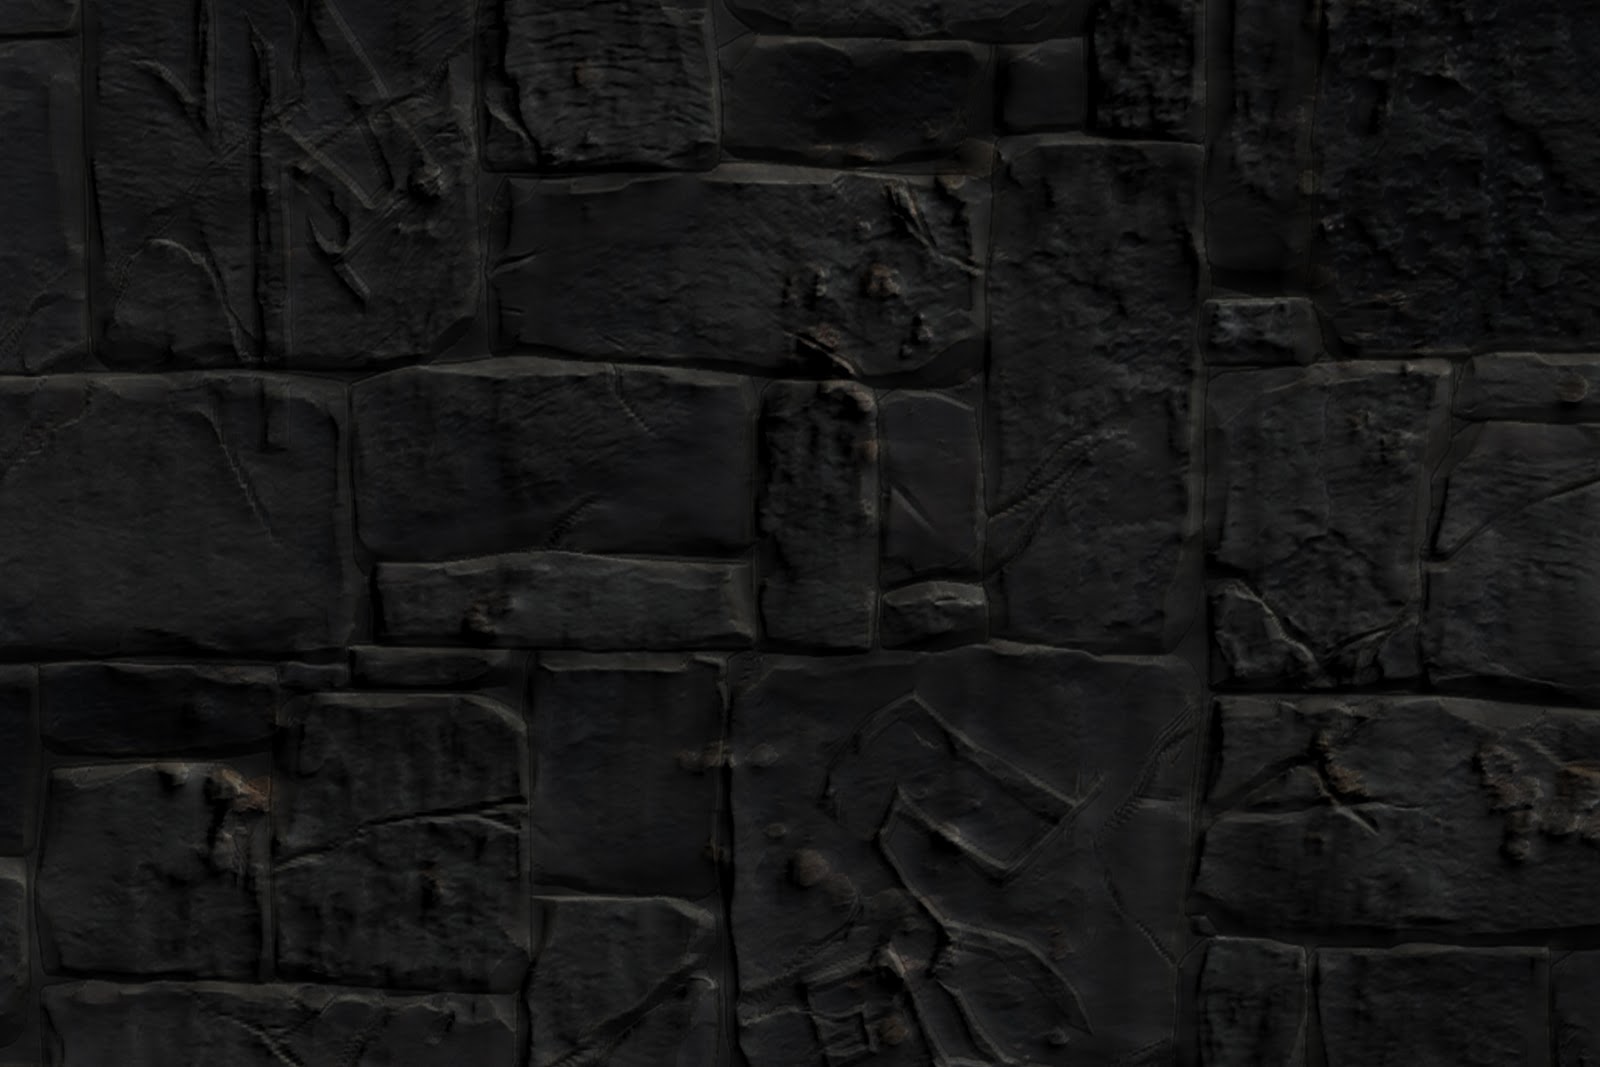
The best way to change the textures now is with a stone shader.

Here is a free set at sharecg.com    free stone shaders


For $2 we can get much better results with


Read More

Monday, August 19, 2013

Modeling Monday 7


Building a Wall

A Walk Through Surfaces, Materials, and Textures.


Let's make some walls we can use as a backdrops.


Basic colors


Let's start with a distant light.
 Create -> New Distant Light  choose default settings then X rotation -15 and Y rotation of 45, so we can get a quick visual feedback of what is happening.

First we need a plane   Create -> New Primitive -> plane

Make it 6 m  with one division.  6 meters makes it a little larger than a room size wall and one division allows a very small polygon count.  X rotation of 90 and move it back Z translate -200.  I like to rename it to wall.

Use the Front View camera, so we can see the wall straight on.

Open the surfaces tab and take a look at the default new wall.  It is colored white, but a render comes out gray.  So how do we get a white wall?

One way is to change the specular color from mid gray to white and reduce Glossiness to zero.  This gives us a pure white wall, but loses the ability to show a shiny or matte surface.  Another way is to change the ambient color to white and increase the ambient strength to 50%.  This works and has fewer problems than the other approach.  One limit is to be sure not to get objects very close to this wall because those objects will pick up some of the ambience from the wall.

How do we want to store this so we can use it again and again?

First save it as a scene subset but in a different directory. Navigate to your DAZ3D My Library -> Props directory.  There make a new directory for your Props ( I use mcProps)  Open that directory and create a new directory for this prop generalWall. Then open that directory and create a new directory colors, but do not open that one.  Save our scene subset as gneralWall.  In the options dialog uncheck the light so you are saving just the wall.


Now we need to save the material.  In the surfaces tab and be sure wall and default are both selected.  In the scene tab wall should be selected.  Then File ->Save As -> Material(s) Preset...  Navigate all the way inside the colors directory we just made.

Now let's make a matte white wall.  Reduce the specular strength to 10% with glossiness at 100%.  Change ambient color back to black and reduce ambient strength to 0%

Now save this as material preset in our colors folder and name it matteWhite.

For a black what that is a sink hole for all lights and shadows on it change the diffuse color to black and the diffuse strength to 0%.  Specular color should be black and specular strength should be 0%.  Make sure reflection and refraction strengths and also 0%.

Now save this as a materials preset into our colors directory and name it deepBlack.

For a shiny black move diffuse strength to 100% specular color to mid gray and specular strength 50%. and the Glossiness to 10%  Leave the ambient dark.

Save this as a shinyBlack material preset.

<< s002 >>   <>


Now we have a simple wall that changes colors just like a prop product.

Add colors you use often using similar setting for bright, shiny and matte.  Save them here as materials presets.

Pictures.


Pictures on a plane make better backdrops than the backdrop feature because you can control the aspect ratio, brightness, perspective tilt, etc.   Also these pictures on a plane have uses beyond backdrops -- for instance, place them outside a window of on interior image to provide an environment without building the whole scene.  

Instead of creating a new plane load our general wall. In the surfaces tab click on the down pointing triangle on the left side of diffuse color choose browse from the menu that pops up and browse to your picture.


Scale, and position your picture the way you expect to use it.You can also adjust diffuse strength, color, etc.   Save this as a scene subset into a new directory inside our generalWall directory  called pictures.


Because you saved them as scene subsets the aspect ratio and other settings are preserved.  If you just saved it as material preset these would be lost and your picture would be stretched to fit the existing wall.  This also loads a new plane rather than recoloring your existing plane.

Pictures without strong shadows or distinct ground planes are generally more useful.  If you do have shadows in the picture you should arrange your scene lighting to match shadow direction for best results.

Textured Wall

Pictures of wall surfaces can work better for you than just a picture backdrop by using other texture features of the surfaces tab.

We need a different base plane than the general wall.

Create -> New Primitive-> plane  6 meters again, but this time chose 80 divisions.

Some of the texturing features get results by altering geometry.  Without divisions, there won't be anything to alter.  This is slightly slower to render, but not by much.  X Rotate 90 and Z translate -200.  Choose a picture of a wall. Switch to respective view and push the wall back until you can see the whole thing.

Here is a stone wall just a picture without texturing features.


Here is the same picture with texture features.


Using photoshop or Gimp, make a desaturated black and white copy of your picture.  Be sure it is exactly the same size and 
position.

Use this b/w picture for bump and displacement strength.  Set the strength between 20 and 50% and the sizes -0.2 and 0.2.  Make a copy of the b/w image and increase the contrast.  Use this contrasty picture for specular strength.

Since this wall is different we need to save it into a new directory under our props  texturedWall 


Read More

Monday, July 1, 2013

Modeling Monday 6


GOBOs


A GOBO is something put in front of a light to create light patterns or shadows in the image.  The term comes from theatrical lighting where it stands for Go Between Optics.  The focusing high power stage lights put some limits on GOBOS that we can overcome in 3D Art.

The are made as simple geometric shapes in an image editing program such as GIMP, Photoshop, etc.  Even simple image programs can make GOBOs.

Here are some GOBOs for light patterns.


Create a plane with DAZ Studio's Create menu -> CreatePrimitive...


Name it in the scene tab to easily distinguish from other planes the scene. Then use the GOBO image in the Opacity Strength image (small down pointing arrow then browse to the GOBO image)  The black portion will become invisible and the white portion will block light.  Be sure your GOBO plane has cast shadows on.


Place this GOBO plane behind the camera (so its not visible in the scene ) and in front of a light.  Its possible to get a good idea where the light is going to be my looking through the lights view (in the camera drop out list)


It doesn't work with a distant light because the distant light is everywhere and doesn't have an effective position.


Substitute a spotlight for the distant light ( sun in the 2EZ light setup ).  This light is blocked by portion of the GOBO as expected plus it has the added advantage -- the spread angle controls the width of the light cone which allows keeping it from going around the GOBO.


The results in the image can only be seen correctly in a render, the preview is not entirely accurate for this effect. A good way to tune the effect is with shadow softness the image above is 25%

Once a good GOBO location is set up,  It is easy to try out the library of GOBOs, but just substituting different GOBO images in the Opacity Strength of the GOBO plane.


Lighting GOBOs are usually are exposed to high heat and extreme magnification,  so they are usually cut from sheets of metal, which limits what they can be.  3D scenes don't have these restrictions, so it is possible to use grayscale images for more effects that black and white.


These images can be prepared with contrast changes, etc.


Color is possible, too.  Because Opacity Strength is an absorption model colors are inverted.  To invert a color subtract each of its RGB values from 255.  So if this orange  200 200 0 is wanted use 55 55 255.  The resultant color will be close, but is strongly influence by light color and the color of the surface it strikes.


Read More