An Excellent Prop
Today I will introduce you to a very high quality prop that it available for free as a gift from an excellent pair of 3D artists/vendors.
The prop is DM's Chapel available for download at:
lChapel
If you click on Freestuff in the menu line near the top of this page you can seenseveral great free items. Too many for a single post, so we will work with DM's Chapel this time.
One of the things I like about DM creations is that they are usually a collection of coordinated items. A very versatile set, several associated items that go with the set, and poses for characters in the set.
The very high quality of the work is readily apparent. DM has stores on Renderosity.com and on DAZ3D.com You will find browsing through them inspiring and rewarding. The consistent excellence is awesome. Their major genre is fantasy, but their steam punk and sci fi items are among the best available. Even though my budget is very limited I have bought several DM products and am very pleased.
The products are usually in poser format which will require unZipping them with something like WinZip, jZip, Stuffit, ... I prefer 7zip. Good instructions on how to do this for DAZ Studio are available at Doc
An easy to follow PDF file is available on that page - scroll near the bottom.
In DAZ Studio to access the prop in your Content Library tab choose
poser format - My Library - Props - !DM Free_P6+
The chapel set has two parts:
The chapel itself
and a part called a divider
There are also two injection morphs (These are used to place parts in your scene for you) One to place a divider on the left side of the opening and one for the right side. If you double click each one both the openings will be filled.
I admit that when I first saw this prop I was disappointed. I was still thinking things, so a chapel should be a full building. No I have learned to think sets and this one is truly great. Let's try it out. Start by loading our old friend Fiery Genesis 1 and changing the backdrop to None, In the Content Library tab navigate to the chapel and add it to our scene.
Read More
The information in this project depends on the earlier Project My Fiery, especially for the 2EZ light set made in that project.
Start with the second ready to render scene from the tutorial.
Change backdrop to none add a plane 4 m X rotate 90 Z translate -100
Remove the lights but keep Genesis, tankini, shorts, hair, and camera 1.
Add in out 2EZ light set.
Next we zero Sally Mae Hair. This means going to the parameters and setting every single one to 0.0 This will go faster after clicking on currently used which will reduce the list down to the one's in use now. The items whose names are grayed out affect the hair indirectly do NOT change them.
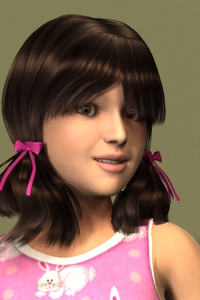
I was never happy with this project. The childish hair and man's underwear look, just didn't work for me. Let's take advantage of a very power ability of the genesis figure and make this a cute little girl instead. This is way easier than it sounds.
1) select genesis in the scene tab. In parameter click All to change back from Currently Used. under Actor - Universal - Basic Child move the slider to about the middle. I used 0.47 The figure becomes much shorter aim the camera to reposition for this size.
2) Still wearing lipstick. In Content Library go to People - Genesis - Materials and double click Basic Child - No Gen. This should change the skin and the makeup. Genesis should be selected in the scene tab before choosing Basic Child - No Gen.
Select tankini in the scene tab. In Content Library - People - Genesis - Clothing - K4 Basic Clothing - Materials. On the bottom row is a pink tankini. double click.
Select SallyMae Hair in the scene tab then in Content Library
People - Genesis - Hair - SallyMae - Materials
There is a Ribbon Neon Pink Hair color changes are here also, but I stayed with the current color.
Eyes
Last Friday (Freebie Friday 2) I showed were to find some free eyes for Genesis.
Select Genesis in the scene tab then in Content Library Presets - Materials - Gee - Eyes I liked brown 4.
Now is time to work on an expression. Please remember to save your scene often as changes are made. In the scene tab expand Genesis and select Head. In Parameters drill down to Pose Controls - Head - Expressions Here you will see a large number of expressions to choose from you can even combine several together. I used Excitement 0.77 and Happy 0.08
Read More
DAZ has a tutorial called Fiery Genesis. It uses Genesis and clothing that came with Studio 4.5 starter set. You can find it in the free 3D models section
fiery-genesis
There is also a YouTube video
video
The main effort is the tutorial is to give users an easy success. There are a couple of ready-to-render scenes as well.
I think these scenes are a good starting point for projects to take the scenes that are OK and use them as a base to make a better image. As I have said before, better is a personal taste and you make feel I have made the scenes worse or blah. If so use these projects as a place to go your own direction.
These ready-to-render scenes also contain a hidden treasure that we can use again and again.
For the first project let's work on the first scene that uses aldora hair. Let's make a better version of this scene with the challenge of using mostly the same content.
Here are opportunities to make a better image:
1) Backdrop is busy and distracting.
2) The expression is the one aptly named "Zero".
3) The lace on the collar is elegant, but the effect is lost because the casual pose shows the clunky under collar support structure.
4) The aldora hair must be meant to be a child's hair or vintage, it looks dirty and scraggily in this context.
5) The skin is stiff and plastic. I think this may be caused by the lighting.
Let's improve these issues one by one.
Backdrop
In the edit menu change the backdrop to none. Build a warm gray panel and put it behind the figure (see Modeling Monday 01).
Expression
In the scene tab expand Genesis all the way to Head the select Head.
In the parameters under Pose Controls-Head you will find Expressions. There a number of sliders for expressions ranging from Afraid, Anger, to Surprise. These run from 0.00 to 1.00 with 0 being absence of the expression and 1.00 being an extreme. Some of these extremes look as if they would be useful in extreme comic book like circumstances. I prefer to .10 through .25 range mostly. You can even combine low range expressions, but be careful some of these can add up to pretty bad results. If you get bad results and can't find a way out, just zero all expressions and begin again.
At this stage the eyes won't be right. Don't spend much time on the eyes now, we will just have to do the eyes again after we have the final pose and framing.
Collar
Do not move the figure. If you move the figure you will lose your lights. Make small adjustments to the camera until you get what you want.
You can create new cameras copying your current camera as a way to back track and compare options. If you name the new camera something like collarAdj3 collarAdj4 ... You can easily return to any earlier stage. Undo doesn't always get there for me because not all operations/moves go on the undo stack.
The video tutorial shows how to get the eyes to stare at the camera. I find this less than optimal -- so here is how I get around it. Make another copy of your final camera (it won't be the one the eyes point at) Swith to the camera the eyes are tracking (probably camera1) move that camera a little for a better eye position. Now switch back to your final camera and you will have your final framing with the eyes a little away from dead on.
Hair
I had a hard time with the aldora hair. I think this must have been meant for a little girl or a depression vintage hair style. By pulling every setting back to 0 and then making it longer I got something I like a little better. The real answer here is to just change hair. The challenge limits I set for us here are not productive I will try to loosen up on the next project.
Skin
As I said I think it was the lights, so I removed all four of the side lights (left and right) leaving only the UberEnvironment2. I like this result the skin looks human and there are gentle modulations in the face surface that were lost before. Unfortunately, this is quite flat and the major forms of the head have kind of lost definition. I added a distant light and set it at Y rotation 45. It was way too bright, so I turned it down to 50% other settings shadow - ray trace, and shadow softness 8%. Still too bright, so I turned down the Uber to 40%. I think this is close to right.
2EZ light set
The Uberenvironment2 light here is the hidden treasure. This light is quite hard to use. My own efforts with it and its help file suggestions were very disappointing. (dark and blotchy). But this works very well. There are almost twenty things to adjust on this light so a good looking set is very useful. Let's make a light set for future use.Save your scene and then remove everything except the distant light and the uberenvironment light. Now Save As light preset and name it 2EZ. In new scenes you can find these in the content library at Presets-Light Presets and you will see 2EZ double click that icon to add our lights to the scene.
This light set demonstrates how I hope to move forward in my 3D Art Journey. They are definitely a beginner's light set. I am sure other available sets are better -- but I don't know how to use those sets. At this point I can't make the best scenes, I certainly can't make perfect scenes. What I can do is make each one better. I can't learn all of the features at once, so having a simple, reliable answer for part of the scene will let me move forward in small steps.
Read More




3_5.jpg)